Traditional Fire starting : How to Make Fire with Flint and Steel
There is something magical about making fire from materials other than the standard Bic lighter or Ohio Blue-Tips. Moreover, it is often a better method than matches.Using flint and steel is one of the easiest of the match-free fire-making methods. Here’s how it’s done:
The Flint
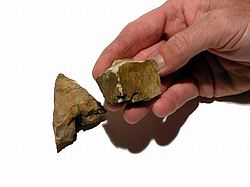
Flint isn’t really a single rock, it’s more
like a loose family of rocks at about eight or so on the Mohs scale of
hardness. Cherts and flints are multi-colored, depending on their
chemical content and vary in hardness.
I use Niagara chert because it’s easy to find in my area – several
unglaciated areas have chert deposits that are easy to harvest. The
ideal flint for striking a spark has a sharp, acute edge that will take a
bite out of the steel. The flint sometimes needs to be “dressed,” or
knapped with a hammer or other flint to get that proper edge. A round
cobble of flint will not work until it is properly edged.It is a common misconception that the flint particles make the spark. This is due to the average person seeing the little dark flint in a disposable lighter, and the steel wheel that does not wear, while the flint does. This is not true flint but a compound of cerium and iron that burns when scratched.
The true flint itself does not spark. Rather, the high pressure exerted on the steel causes a small curl of steel to peel off and ignite. To understand why the steel ignites, bend a coat hanger over and over again in one spot. Soon it will be so hot you cannot touch it. That energy warms the metal. Now imagine putting all the force of your downward stroke into a microscopic flake of metal. Of course it burns!
The Steel
 A
good steel is made of a high-carbon tool steel. My favorite is W1, a
water-quenched tool steel that I quench in oil to get it to the proper
hardness. When oil-quenched, it is hard enough to resist the pressure of
the flint, except for the small piece that ignites. A properly treated
steel should give off thousands of sparks, if not millions, before being
lost. You will certainly not wear one out. If the steel becomes too
hot, it must be re-tempered before it can be used again.
A
good steel is made of a high-carbon tool steel. My favorite is W1, a
water-quenched tool steel that I quench in oil to get it to the proper
hardness. When oil-quenched, it is hard enough to resist the pressure of
the flint, except for the small piece that ignites. A properly treated
steel should give off thousands of sparks, if not millions, before being
lost. You will certainly not wear one out. If the steel becomes too
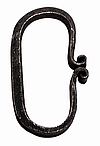
hot, it must be re-tempered before it can be used again.The shape of the steel is a personal preference. C-steels, which are roughly the shape of a letter “C,” are most common.
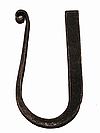
U-steels are often used by folks with
larger hands who can’t get them comfortably in a C-steel. They are both
used in the same manner.
The Char Cloth
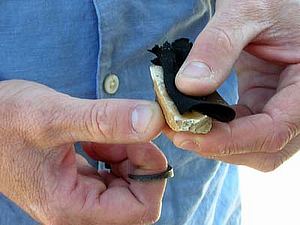
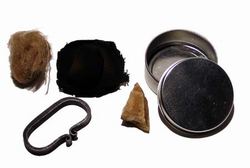
You can make sparks all day without causing so much as a wisp of smoke if you are not giving your sparks a happy and fruitful ground upon which to light. The best material for such fire-starting is char cloth, which is simply linen or cotton cloth that has been burned in a low-oxygen environment (like the small tin in the above illustration). A small hole poked in the top allows smoke and pressure to escape without the oxygen burning the cloth completely.To make char cloth, pack a small airtight tin with linen or cotton patches about 2 inches square. Place the tin on some hot coals in a fireplace or campfire and let it cook for at least 20 minutes, or until the smoke subsides from the hole you poked in the top. Let it cool completely, and don’t open it for several hours or even overnight – the cloth will catch flame and burn to a cinder.
Once you have char cloth, you need…
Tinder
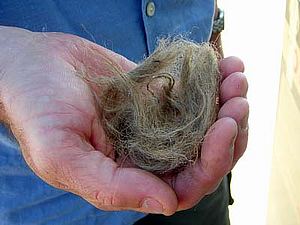
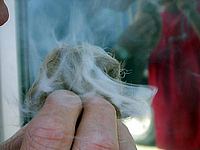
Everyone knows what tinder is. It’s anything that burns if a spark lands on it – dryer lint, dry grass, whatever. Finding dry tinder is another article unto itself, and there are lots of places to do so, but success depends so much on what terrain you’re in that it’s not worth talking about here. What is worth talking about is a lightweight, portable substitute: oakum.
Technique
It’s pretty simple, actually. First, make sure your tinder is
prepared and ready to accept your char cloth. Make a nest as shown,
and put it where you can reach it easily. Your fire bed should be
already prepared with kindling and fuel and ready to accept your burning
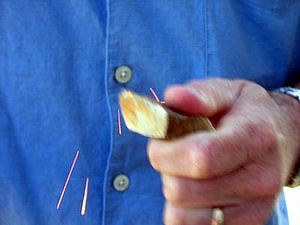
tinder.Now place a small piece of char cloth on the top of the flint as shown. The goal is to shave off a very small strip of metal that will burn and land on the char cloth. Striking down at about a 30-degree angle should create a spark or two, which will cause the cloth to glow red where they land. This often happens on the edge of the cloth and is hard to see in bright sunlight. If a spark lands on the char cloth, wait and blow gently on it until you see either a glowing crescent or nothing. If nothing, go back to striking.
If you do have a glowing piece of char cloth, great! Fold it onto itself and blow gently to encourage the spark to spread. Here’s the wonderful thing about starting a fire this way – the best time to do it is in the wind, where matches are blown out quickly. In fact, the stronger the wind, the faster your char will be consumed. Place the glowing char into the prepared tinder nest and carefully fold it in on itself. Remember, you still need oxygen in there.
Blowing gently will cause you to see wisps of smoke coming from the bundle. Perfect. Just keep blowing, and pretty soon – POOF! You’ll be ready to start a fire.
With practice, you will be able to start fires consistently and often faster than with conventional methods, especially in adverse conditions. If you have any questions, feel free to comment, and I’ll answer as best I can.
Traditional Firestarting : Fire from Friction
If you want to understand how fire by friction works, consider the time you slid down the slide at the playground and realized you were going way too fast. You tried to slow yourself down by grabbing the sides of the slide, but your hands soon became too hot to hold on. If you never had this experience, think about how warm your hands get sliding down the rope in the gym. Hot stuff, right?
Imagine concentrating all that energy into a small space. Properly concentrated, a little bit of friction can create a fire very quickly. The trick is patience, patience, and then more patience. “You can’t hurry love,” said Diana Ross. “You just have to wait. Love won’t come easy; it’s a game of give and take.” So is fire by friction. You can’t hurry fire.
The Theory
To create a fire you need heat, fuel, and oxygen. The heat is supplied by friction between the spindle and the hearth board. The fuel is supplied by the hearth board eroding and creating punk: fine, dark brown powdery stuff. The oxygen is provided by Mother Nature. Simple as that.The Equipment
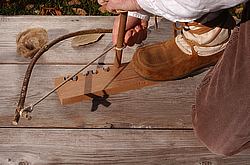
The hard part is choosing the right materials for a spindle, a hearth board, and a bow. Hearth boards are best made of a softer wood like cedar. I use old shakes; they work great. I have also used cottonwood and willow in a pinch, but nothing smells as good as cedar when you’re starting a fire. Some like catalpa wood.Spindles should be long, straight pieces of wood. In the west, folks often use mule fat (the bush, not the equine lipid). Horsetail works well too. I find that a good cedar or fir spindle works great. It should be about 9 or 10 inches long and the same thickness, about ¾ to 1 inch, throughout the length of the spindle. If the thickness varies, the string will crawl toward the narrow part of the spindle.
The bow should be a flexible piece of wood with enough spring to maintain tension on a piece of rope. I use willow limbs, but you can use a number of things.
The socket (the top part of the whole equation) should be a harder wood like walnut or oak and should be comfortable to hold. I have used elm or ash; my current socket is half a piece of ash. Osage orange is wonderful and is good for a bow as well if you can get a nice piece bent in the right place.
The Technique
First, grease the top of your spindle. I rub it in (what’s left of) my hair, behind my ears, along my nose, anywhere there are skin oils. If you have some fat, soap or grease, a little dab will do. That means the spindle will NOT have friction on the top but will on the bottom, where it meets the hearth board.There is a definite technique for holding the bow and drill successfully. For right-handed people, use the directions that follow. For left-handed people, reverse everything. Place your left foot on the left side of the hearth board and the indentations on the right. The cord should twist around the spindle once, and position the bow and spindle so that the business end of the spindle is facing down, the arc of the bow to the right (away from your knee). Hold the socket in your left hand and steady your left wrist against your left lower leg. Move your right foot back from the hearth board a bit, and place the lower end of the spindle in the hearth board where you want an indentation.
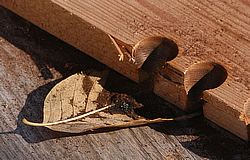
Now you’re ready to make an indentation. Pick a spot where the diameter of the spindle lines up with the edge of the hearth board. Then, rotate the spindle slowly and wear away a little dimple, and you’ll see some smoke. When you wear away a large enough dent to hold the spindle easily in the depression, stop and use your knife to cut away a small notch, almost to the center of the spindle dent. This allows the punk dust to fall out of the hole, but it also provides an edge where heat can really build up and eventually cause the punk to ignite. Place a leaf or other small flat object under the notch to catch the fruits of your work.
The trick is slow, methodical, rhythmic movements. Don’t push down super hard, don’t go super fast, just nice and easy does it. You will see punk start to pour out of the notch and land on the leaf or piece of bark collecting the punk dust. Smoke will waft up and smell really good. When you see a good amount of smoke, stop and look at the punk. If it continues to smoke, congratulations! You have a coal in your punk! Now place the coal in your prepared tinder bundle, and blow gently until the coal catches the tinder and bursts into a happy flame.
The Hand Drill
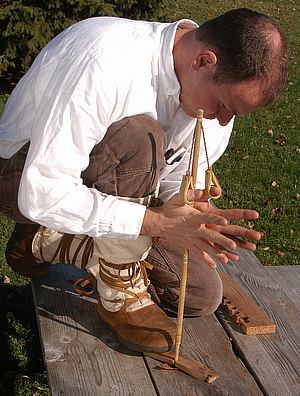
The hand drill is nothing new, but it’s
much harder. The thumb loops are a modification by wonderful
artist/primitive skills advocate Dino Labiste. The concept is identical,
except you need to use your thumbs to apply downward pressure. The
spindle is not consumable, so small pieces of wood are carved into
“bits” you place in the spindle. Same rules apply–slow, methodical and
rhythmic movements, no speed demons or anything like that. Patience
wins.
For more information about primitive fire by friction, If you’re interested, you can purchase fire-by-friction materials
there. It’s a blast. I especially enjoy the contest to build the
smallest fire-by-friction set.Editor’s note: This is a guest post from Darren Bush.
_____________________________________________________________
Darren Bush is the owner and Chief Paddling Evangelist of Rutabaga, but he’s also an amateur blacksmith, longbow shooter, and primitive skill aficionado. He believes primitive skills are highly undervalued in modern society.
